Sunday 10 March 2024

Making a Crackle Printing Plate!

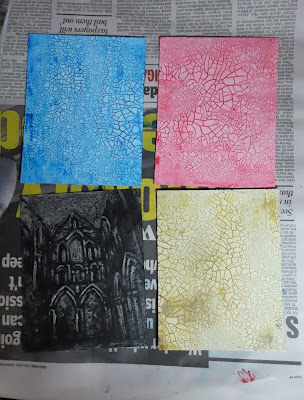
I have been doing a lot of experimenting recently with overlaying a crackle textured printing plate on top of some of my older collagraph printing plates to create some different patterns and age. 

I discovered, by accident, a few years ago a reaction to using two different shiny paints which causes the top coat to crack and then produce fine lines which are an interesting texture to print. These are all completely random so are very fun to produce!

Here's how about making a crackle printing plate:


I use a piece of scrap mountboard cut to size. Then I apply a layer of gloss acrylic medium all over the mountboard. It doesn't have to be too even, infact as uneven as possible seems to produce more interesting cracks!


Once the acrylic medium is completely dry I add a layer of radiator paint (it only works with the cheapest possible radiator paint, this one was about £5 from B & M Bargains) Again this layer doesn't need to be even. The radiator paint then needs to dry out overnight and the reaction is best done in a cold room (I have put the prinitng plates in the fridgeto crackle too!)


A tiny bit of cracking is starting in the corners after a few hours but don't be tempted to touch these plates until at least 24 hours has passed and they are completely dry.


Its hard to photograph the cracks as they are white on white! Heres the finished crackle printing plate all inked up with yellow ochre ink and my Dudley Castle collagraph printing plate ready to be printed.


The castle printing plate goes through the printing press first with the edge of the paper caught slightly under the roller so that I can then align and replace the castle printing plate with the crackle printing plate to print on top of the image.


The crackle plate is then printed on top of the castle image. (As the ink is still wet you can see some residual ink left from the castle on the crackle plate)

Dudley Castle Collagraph Print


I'm only printing these in very small editions, four for this one.


A close up of the finished collagraph print so that you can see the interesting textures created by the crackle plate!

Clare x


Saturday 17 February 2024

Printing a Staircase!


After visiting Picton Castle last year I was fascinated by the crumbling staircase there and I really wanted to depict it as a collagraph print. I finally got round to making the printing plate the end of last year but I really felt it needed something more so I made another printing plate to go over the top with crackles on it. I felt this really depicted the age and added a bit more interest and depth.

I inked up and printed both of the printing plates at the same time.

Inking up and wiping both printing plates below.


The first printing plate was printed on my etching press of the staircase inked up in blue/black ink.

I kept the paper caught under the roller of the printing press so it wouldn't move and then placed the crackle plate inked with yellow ochre printing ink ready to print.

This was then printed on top of the staircase print. (A little of the staircase ink transfers to the printing plate too!)

The finished collagraph print hot off the printing press!


I'm really enjoying playing with crackle plates at the moment so will be doing lots more experimenting!

Clare x


Tuesday 28 July 2020

Painting a Mad Hatter Tiger

I decided to have a go at filming myself while painting, it was my first time so I was a bit nervous! I treated myself to a tripod for my camera and thought I'd have a go with one of my favourite subjects, a tiger.


I managed to attach my camera to a chair to keep it steady. I did discover the camera was in the way quite a lot and also my hand kept blocking the view as I was painting, so next time I might set it up a bit differently,  but in the end it wasn't too bad. I also knocked the camera a couple of times but luckily it isn't too noticable in the finished version of the video! 


I've speeded up the video and made over an hour of painting into just over a minute, wish I could always paint that fast!


Here's the finished painting:
Mad Hatter Tiger - Acrylic Painting
I've also made it into a greeting card:


Mad Hatter Tiger - Greeting Card
And a badge set:


Steampunk Tigers - Badge Set
So I have tigers everywhere!

I'm looking forward to another foray into filming soon!

Clare xx

Thursday 28 May 2020

Art Exhibitions


In these weird times the way we exhibit artwork has changed an awful lot. I have just entered three online exhibitions (keep your fingers crossed!) and thought I'd have a look back at some of my recent exhibitions.

I started off the year really well by managing to get one of my collagraph prints "Tiger Relax" accepted into a very difficult exhibition to get into, the RBSA (Royal Birmingham Society of Artists) Open exhibition. 


This exhibition opened in March and luckily I managed to see it before lockdown happened and the gallery closed. Sadly I didn't get to wear my posh frock as the closing party was cancelled! The exhibition is actually still on at the gallery, as it couldn't be taken down, and I'm hoping the building ghosts are enjoying their exclusive exhibition at the moment!

My favourite exhibition of last year had to be the Wolverhampton Society of Artists Centenary exhibition at Wolverhampton Art Gallery in December. I was very shocked to win first prize in the Selection Panel Choice and got to meet the Mayor of Wolverhampton who presented me with my certificate!


I also exhibited another couple of times at the RBSA last year. Back in March 2019 for the Open All Media exhibtion, where I exhibited an oil painting for the very first time!


And in July 2019 I exhibited my collagraph print "Tiger Feet" in the annual Friends exhibition and even got to do a 5 minute talk about how I make my collagraph printing plates!

I really have had a busy few years of exhibitions and hopefully soon we will be able to exhibit properly in real life again!

Clare xx


Wednesday 29 April 2020

Tiger Oil Painting


A few months ago I treated myself to a new camera and took it to Dudley Zoo to try it out and get some interesting animal shots. The male tiger Joao likes to pose and I got some really good shots of him ready to be made into some artwork.


While on lockdown I thought I would try a different painting medium - oil paints. I haven't done an oil painting for ages as I loose my patience with it as it takes a long time to dry so I tend to use acrylic paint more but I thought as I have plenty of time I would give it a go again!

I took a few photos while I was painting. Here's the very first layer, I just like to cover the whole canvas with thinned down paint and just establish as much of the image as I can very loosely. 


A few layers in and I'm just trying to establish a bit more detail but also I like to get a palette knife out and scrape the paint off again so you can see some of the other layers. I can't help it with oil paint I love scraping at it and the interesting marks the palette knife makes.


The finished painting. I've darkened down the background and added a bit more detail but still tried to keep the expressiveness of the marks of the paint.


In the end I could only really manage painting this tiger in small 10 minute chunks so I'm very pleased with how it came out. Will have to try another oil painting soon too!

Clare xx

Sunday 29 March 2020

Tigers & Mucky Bottoms!

Normally if I'm printing more than one colour I try and add all my colours onto one collagraph printing plate and print it in one go, as its a lot easier! I decided to challenge myself and try out a different method involving two printing plates and a mucky bottom! I thought I would depict my favourite subject, a tiger.


Here are the two printing plates side by side. One is very much like my normal collagraph printing plate with lots of detail and tone, the other is a bit more abstract and will be used for background of the image.


I started by inking up the more abstract plate for the background with a lovely vibrant orange ink. (apologies for the blurriness of this image, trying to take the photo left handed and not succeeding very well!)


The background plate is inked and then wiped so that the rougher areas of the printing plate hold more ink and the smoother areas hold less ink and will therefore print lighter. It is ready to be printed. 


But first I need to get the main printing plate ready to print as I will be printing them almost at the same time. I've had to completely clean up everything first, getting rid of any orange ink, newspaper, gloves etc so I don't contaminate this plate with any orange ink. The printing pate is then covered in blue/black ink and then wiped with newspaper and tissue paper. 


The main printing plate ready to be printed.


Firstly the background printing plate is placed onto the printing press onto a clean scrap piece of paper and a slightly dampened piece of printing paper is put on top, with the blanket on top of this. This is then run under the rollers so that it prints onto the slightly dampened paper. The paper is then peeled back and very carefully trapped under the rollers so that it doesn't move and the printing plate is removed.


This leaves behind an imprint of where the printing plate was on the scrap paper, its mucky bottom! 


I can then place the main printing plate on top of this mucky bottom (making sure I put it the right way up!) aligning exactly where the first printing plate was on the scrap paper and as the slightly dampened paper was trapped in the rollers it should go back over the printing plate in exactly the same place as where the first plate was.


This then goes through the rollers again transferring the black ink on top of the already printed orange image. The big reveal, has it worked or not?


One tiger hot off the printing press!

Then repeat many times! 

"Tiger Sit" Limited Edition Collagraph Print


Here's the finished tiger print, I'm thinking of trying it in a few different colours too!

Clare xx

Sunday 16 February 2020

Art Studio


I thought I'd introduce you all to my art studio where I produce all my artwork and which started out in my spare room and now seems to have gradually spread all around my flat!


My lovely table-top etching press taking pride of place in my studio. It's very well used and a little bit inky, as its quite a few years old now, but has printed many tigers, hippos, cats etc and is still going strong!

Lots of inks etc being supervised by Morph and Kermit!


My desk, which I was very proud of managing to put together when I had a flatpack building frenzy when I first moved in. Including my best purchase of last year, a badge maker, which has proved incredibly popular at all of my selling events.


I was trying to keep all my artwork activities in my spare room but because the light is amazing in my living room I seem to end up painting in there instead and have gradually taken over my dining table! 

A very sneaky look at what I am working on at the moment. Two brand new collagraph printing plates, lots more work to do on them but I should be proofing them very soon. I will never learn to not leave my hot chocolate near my artwork, I've lost track of how many times I've dipped my brush in it!

Just to show that I definitely do take over everywhere - an improvised drying rack for my hand printed tote bags in my main bathroom! I also use the bath to soak my paper when I am printing so its a good job I have an en-suite shower room I can use too!

I'm house hunting at the moment so hopefully I will have a brand new studio to show you soon too!

Clare xx