Wednesday 10 July 2019

Drypoint Printmaking


I've had a few days off work this week so I thought I'd dig out my etching press and do a little bit of printmaking!


I decided to have a go at some drypoint printmaking as its very quick and immediate. Drypoint is where the image is scratched into the printing plate using a "drypoint" creating a line and also producing a burr, which is a rough ridge on the plate that prints a slightly ragged line, these lines hold the ink when printed and produce a rich velvety texture.


I found the drypoint needle that I was given while at university and 26 years later it still works absolutely fine! Whilst at university we used to use aluminium plates for drypoint printmaking from the commercial printers that were below us but nowadays I use Rhenalon plates which are very thin perspex sheets and as these are transparent I can put an image underneath the plate and use it as a guide while I am working on the plate.

You can just about see the scratches on the printing plate below with the image I am working on underneath.


And the printing plate scratched into and ready to be printed below. Its very hard to see some of the lines and sometimes easier to just run our nail over them to gauge the depth.

Now for the messy bit! I use the Caligo safe-wash etching ink straight from the tube as it needs to be quite thick to stay in the lines and cover the whole of the printing plate with it. 

I then wipe the printing plate with newspaper and then tissue paper to remove the surface ink but being really careful to leave the ink within the lines. Caressing the printing plate as my University tutor always used to say!


Then onto my etching press with slightly dampened paper on top of the printing plate and once under the rollers the big reveal as the paper is lifted off! 

This can be the slightly scary part as drypoint printing plates are very fragile and can only really be printed a few times as the process of going through the printing press flattens the lines and dulls the prints. I tend to do mine in editions of 6 so each print really counts.

The finished prints hot off the printing press! 
Ring Tailed Lemur & Baby - Drypoint Limited Edition Print

Tiger - Drypoint Limited Edition Print
Clare xx

Friday 28 June 2019

ACEO Tiny Paintings!

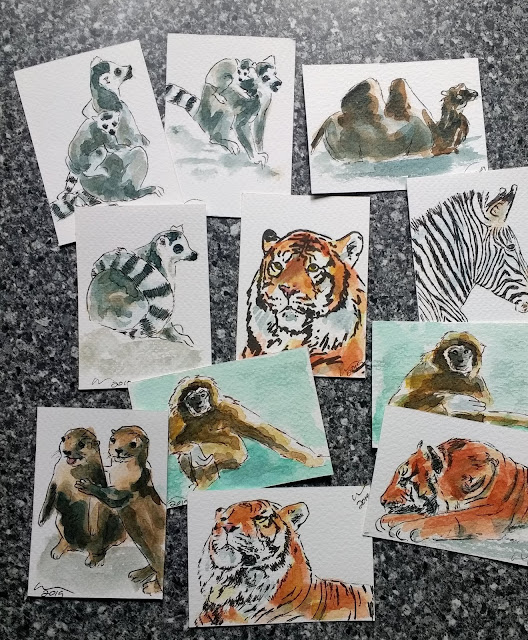
I have been painting teeny tiny paintings called ACEO's for quite a few years now. ACEO stands for Art Cards, Editions and Originals. Basically a tiny painting/drawing/print/etc which must be 3.5 x 2.5 inches, about the size of a playing card, and as I have discovered people love collecting them!

A 50p piece to show the scale!

I hadn't painted any new ones for quite a while but after my recent visit to the local zoo, and taking a few hundred photos whilst there, I decided to paint a few more. Two of these tigers have sold already!


I find them a very good way of seeing if a larger painting will work as if an image really stands out when tiny it should work on a larger scale. For example the tiny painting of a tiger that I recently did I liked so much I made it into a big acrylic painting.


I think it has also made me paint a lot freer as its very difficult to get a lot of detail onto a tiny piece of paper and I feel it has really improved my watercolour painting. Also because I'm quite an impatient painter and hate waiting for paint to dry, I find that when I'm doing a large watercolour painting I try and work on about 10 ACEO's at the same time. By the time I have put a layer of paint on every painting the first one will have dried and I can start all over again!


So far I have sold 401 of these mini paintings with tigers and cats proving the most popular and the majority going to the USA! 


A few examples of my tiger ACEO's, I'm rapidly running out of titles for these!

Most of my ACEO's I sell on Ebay or Etsy and its a really good feeling when people come back for more and have a little collection of my mini artworks!

Clare xx 


Sunday 3 March 2019

Printing Tiger Feet!

I have a slight obsession with tigers and whenever I go to Dudley Zoo I spend hours watching the tigers. I was really lucky the last time I was there as the male tiger Joao was having a little sleep and showing his lovely big paws which I just wanted to tickle!
I knew I would have to produce some artwork of him so I decided to do a quick acrylic painting:
Sleeping Tiger Acrylic Painting
He looked so cute I thought he would work brilliantly as a collagraph print too, here's the start of my printing plate being designed.

About to start printing, not many people get to see the printing plates before they have been inked up and got very messy!

Here he is after being inked up. I've inked him A la poupĂ©e which is a technique for applying different colours of ink using a ball-shaped wad of fabric to apply the ink which then means I can print the image in just one run through the press. Its a bit fiddly but well worth it.

Hot off the printing press!

A few different variations of the tiger print, still deciding which one I like the best.
I moved house about 5 weeks ago so I am still unpacking everything but my new studio is starting to come together and I'm really enjoying doing a bit of printmaking again!
Hopefully lots more new prints coming soon!
Clare xx